This is the fifth of a series of articles by bird photographer Mike Atkinson aimed at introducing more people to this wonderful hobby.
There is nothing more frustrating in bird photography than thinking you've captured some great images, only to find later that they are unusable due to over- or under-exposure. This month, we'll look at how you can greatly improve your success rate with exposure.
The good news about exposure is that it's nowhere near as much of a problem as it used to be. Compared with slide film, Digital SLRs are much more forgiving of over-exposed or under-exposed shots. This is especially true if you shoot in RAW mode because, within reason, you can change the exposure on your PC during post-processing.
When you're starting out, then, you can usually just set your camera to automatic exposure and go with whatever exposure the meter sets, then make any necessary adjustments later in your image editing software.
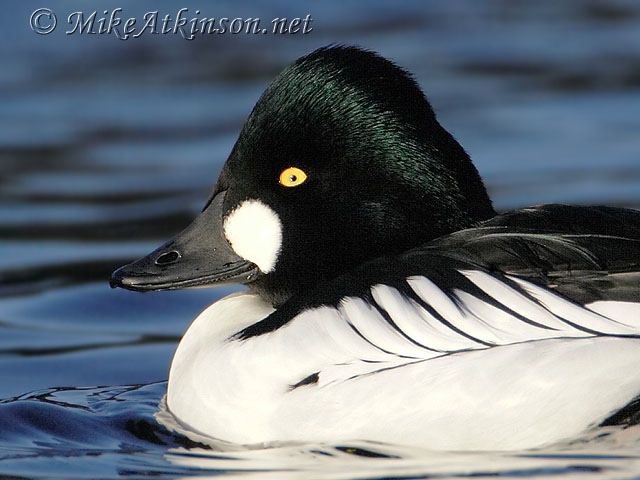
Exposure Digital technology makes exposure less of a problem, but to be able to capture reliably scenes like this high-contrast close-up of a male Goldeneye, you need an understanding of how camera exposure meters work and how to compensate for their shortcomings.
Histograms
Beyond this, without needing to understand anything about exposure theory, you can make great improvements in your exposure accuracy by using the histogram display on your camera. Check the histogram immediately after taking a shot and check that the range of brightnesses is as far to the right of the display as possible, without 'clipping', i.e. the graph should taper down to zero just before it reaches the right-hand limit. See Tutorial 2: Getting Started for an illustration of this.
Exposing at this level gives you the maximum amount on information in your image, with the minimum amount of noise. The main problems with using histogram displays to get the correct exposure are that these are very difficult to see in the field and you often don't have the time to go through a shoot-check-adjust-reshoot cycle before the bird has gone.
Overexposure
One problem with digital images is that any burnt out areas, i.e. areas with the maximum brightness level, have no detail in them whatsoever and so there's nothing you can do to rescue these. As an alternative to the histogram view, your camera will probably have an option to show your image with these 'blown highlights' flashing, so that you can see where they are in the image. This is useful because they may be in an area that's going to be cropped out or that you feel will not detract from the image as a whole, in which case you can just ignore them.
Underexposure
Less of a problem occurs with underexposure of digital images. At some point, everyone is wowed by the detail revealed when brightness levels in an almost-black image are boosted on a computer. To avoid the problems of blown highlights, it's tempting to deliberately underexpose all your images and then brighten them during post-processing. The downside of this, though, is greatly increased noise and less smooth transitions between brightness levels.
That said, many professional photographers routinely underexpose by a small amount - around half a stop - to ensure they don't get blown highlights. The slight loss of image quality resulting from this is less of a problem than irretrievable blown highlights. If you think there may be a risk of overexposing a shot, then, just set your exposure a bit lower to be on the safe side.
Noise
There are two main types of noise in digital images. The first is called luminance noise and looks a bit like film grain. The second is called chrominance noise and appears as blotches of false colour, such as purples and greens. Both types of noise increase dramatically with higher ISO settings and increased underexposure. See Tutorial 4: Camera Settings for an illustration of digital noise.
It is possible to buy noise reduction software and many image editors have this built in so, again, it's tempting to just address noise during post-processing and enjoy the benefits of high ISO settings in the field (such as the ability to use faster shutter speeds to stop motion or smaller apertures to increase depth of field). In this case, the downside is that, as well as reducing noise, the software also throws away detail in the images, e.g. giving fuzzy patches where you should be able to see feather detail and generally giving your pictures an artificial, painted look. An accurate exposure should, therefore, always be your aim.
Bracketing
Another technique you can use without worrying how your meter works is exposure bracketing, in which you just take extra pictures either side of the meter's recommended exposure to make sure you get at least one well-exposed image. This is a valuable technique, especially in difficult lighting situations such as backlighting or dappled sunlight coming through trees, and is made much easier by the auto-bracketing feature available on most DSLRs. However, it does increase the number of images captured, so your memory card will fill up quicker and you will have more images to sort through during post-production (my least favourite part of bird photography). It also means that you may end up missing the perfect moment, especially in times where you're dependent on continuous shooting. It's frustrating to have the best image of a set ruined by blown highlights.
Understanding your meter
Okay, so you can get a long way by just trusting your meter, using your histogram display to adjust exposure and using bracketing when you need extra reassurance but, to get beyond a certain level, you need to understand how to use your meter to get a good exposure first time. By knowing what your meter is trying to do, you can either accept its recommendation or deliberately increase or decrease exposure in situations where you know this won't give the best result. By practising dialling in exposure compensation without taking your eye off the bird in your viewfinder, you can make sure you get a correctly exposed shot no matter how fleetingly the opportunity appears. (Well, most of the time!)
So what does your meter try to do? Simplistically, it tries to make your image mid-toned on average, so that if your picture contains nothing but mid-tones (e.g. a field of grass on an overcast day), it would come out at the correct exposure level. If the scene contains a wider range of tones (e.g. the same field of grass under bright sunlight), the meter tries to set the average of these tones to mid-grey, so that they will have the best chance of all being captured without over- or under-exposure.
I say simplistically because modern multi-segment meters (when set to matrix or evaluative mode) take many separate readings from different parts of the image and apply advanced computing and pattern-matching to automatically compensate for extremes of brightness in a range of image types.
Applying exposure compensation
In practice, the effect of this sophistication of modern meters is to reduce the amount of exposure compensation needed. You will, therefore, see a difference between my guidance and that based on the use of older average or centre-weighted-average meters. You will normally need to compensate in the same direction, but with a reduced amount. In the following image captions, I'll describe the compensation that should be used in various scenarios. It’s worth taking the time to study how the histograms relate to the image in each case. A summary table is included at the end.
 | |
| Light subject and background The first scenario where exposure compensation is needed is when both your subject and the rest of the scene (I'll call this the 'background' for simplicity) are both white/pale/bright. To avoid these being 'turned grey' by your meter, you should set an exposure compensation of +0.5 to +1. Mute Swans make great subjects to practice metering for white birds. |  |
 | |
| Dark subject and background This is the opposite scenario, and so an exposure compensation of -0.5 to -1 should be set. Without reducing the exposure on this captive Golden Eagle, the yellow highlights around the bill would have been overexposed. |  |
 | |
| Light subject and dark background This is a slightly more complex situation because it depends on how much of the image is occupied by the subject. If the subject is small in the frame, the meter will tend to overexpose the mass of dark background (to make it grey) and, in the process, will make the light subject very much overexposed. An exposure compensation of around -1 should therefore be used. If the subject takes up most of the frame, a slight positive exposure compensation (+0.5) should be set to avoid it being underexposed. If neither the subject nor the background is dominant, leave the exposure compensation at 0. The light parts of this Black-headed Gull photo occupy around a quarter of the frame, so a compensation of -0.5 would be a good option. |  |
 | |
| Dark subject and light background Again, this opposite situation calls for a compensation ranging from +1 for a small subject through to -0.5 for a large subject. The dark parts of this Rook photo occupy around a third of the frame, so a compensation of +0.5 would be a good option. |  |
 | |
| Mid-tone or mixed-tone subject and dark background This is a milder version of the light subject against a dark background. You should therefore use a compensation of -0.5 for small-in-the-frame subjects to 0 for medium to large subjects. This female Goosander is small in the frame, so -0.5 is ideal. |
 |
 | |
| Mid-tone or mixed-tone subject and light background Use +0.5 for small subjects or 0 for medium or large subjects. This large-in-the-frame Turnstone is a mixed-tone subject with a wide range of brightness values. The background is even brighter than the white parts of the bird. An exposure compensation of either 0 or +0.5 would give good results here. |  |
 | |
| Mid-tone or mixed-tone backgrounds Not surprisingly, these should typically have compensation mid-way between the values for light backgrounds and dark backgrounds, for a given subject size and brightness. In fact, this Shelduck photo may look like a difficult exposure situation, but it is in fact an easy one. The background is almost all at the mid-tone level that would be set by the meter without the bird present. The bird itself has bright and dark areas in roughly equal measure, so no exposure compensation is required. |  |
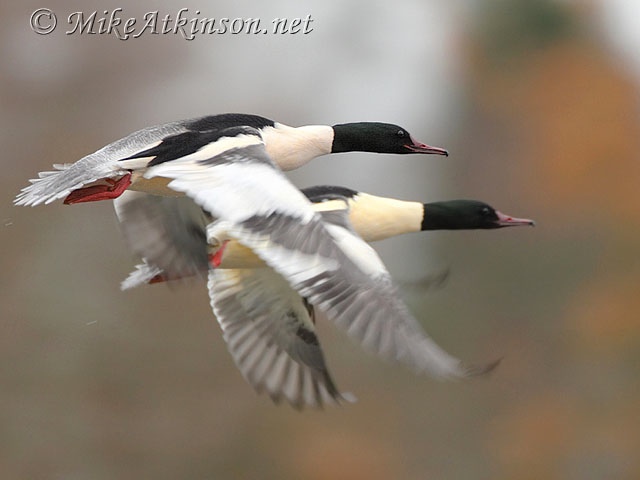 | |
| Manual metering Occasionally, you will come across situations where brightness levels are changing so fast that your meter struggles to keep up. A classic example is where you're tracking birds that are flying across alternating light and dark backgrounds. In these circumstances, if you have the time to get set up beforehand, it can be better to set exposure manually (based on an area of mid tone in the background) and then just shoot the birds as they come across. These flying male Goosanders are a good example of where this technique can be effective. |  |
 | |
| Extreme tonal range Sometimes, the range of tones is so great that no exposure setting will cope with both the shadow and highlight details. It may, however, be possible to sacrifice one or other and still have a usable image. In this case, it was worth giving up the highlights on the side of the Tufted Duck to retain the shadow details. |  |
Summary table
The above advice is summarized in the table below. Note again, however, that a 0.5-stop exposure compensation can easily be made during post-production without a serious loss of image quality so, to start with, concentrate on the areas where a full stop may be needed (I've highlighted these in bold).
| Light background | Mid/mixed-tone background | Dark background | |
| Subject small in frame: | |||
| Light subject | +0.5 to +1 | 0 | -1 |
| Mid/mixed-tone subject | +0.5 | 0 | -0.5 |
| Dark subject | +1 | 0 | -0.5 to -1 |
| Subject half-filling frame: | |||
| Light subject | +0.5 to +1 | +0.5 | 0 |
| Mid/mixed-tone subject | 0 | 0 | 0 |
| Dark subject | 0 | -0.5 | -0.5 to -1 |
| Subject large in frame: | |||
| Light subject | +0.5 to +1 | +0.5 | +0.5 |
| Mid/mixed-tone subject | 0 | 0 | 0 |
| Dark subject | -0.5 | -0.5 | -0.5 to -1 |
Next month: Basic Composition
Should you place a bird in the centre of your picture, or off to one side? What if it's facing you, or flying? What if it has a reflection, or if there are multiple birds in the shot? Next month, we'll look at how getting these choices right can give your images a much more pleasing and professional look.
